
Artalk có hỗ trợ upload thông qua qua Upgit, mà Upgit thì hỗ trợ upload lên Github, Imgur, Cloudinary, toàn dịch vụ to vật, vừa đỡ tốn dung lượng, vừa hỗ trợ thêm CDN, nén ảnh nữa, rất nên dùng nếu trang của bạn có nhiều người thích upload ảnh lên comment 😀
Đơn giản nhất thì dùng Github làm storage, nếu thích tối ưu hơn, có thể dùng Jetpack để nén ảnh và dùng Cloudflare để CDN giúp các ảnh ở phần comment nhanh hơn
Cài đặt Upgit
Mình cài đặt và cấu hình Upgit vào bên trong thư mục Artalk/data, tiện cho công đoạn backup, restore Artalk
wget https://github.com/pluveto/upgit/releases/download/v0.2.19/upgit_linux_amd64 -O /root/Artalk/data/upgit
chmod +x /root/Artalk/data/upgit
wget https://raw.githubusercontent.com/pluveto/upgit/main/config.sample.toml -O /root/Artalk/data/config.toml
Mở file config.toml ra, điền các thông tin tài khoản dịch vụ ảnh bạn muốn dùng, có thể tham khảo cấu hình mình set upload ảnh lên github sau đó dùng Jetpack để nén ảnh và dùng Cloudflare để CDN
# =============================================================================
# UPGIT Config
# =============================================================================
default_uploader = "github"
rename = "{year}/{month}/upgit_{year}{month}{day}_{unix_ts}{ext}"
[output_formats]
"bbcode" = "[img]{url}[/img]"
"html" = '<img src="{url}" />'
"markdown-simple" = ""
[replacements]
"raw.githubusercontent.com/bibicadotnet/img-upgit/main/artalk-img" = "api.bibica.net/comment"
# Github uploader
[uploaders.github]
branch = "main"
pat = "ghp_xxxxxxxxxxxxxxxxx"
repo = "img-upgit"
username = "bibicadotnet"
Lúc này cấu hình bên trong Artalk sẽ như sau
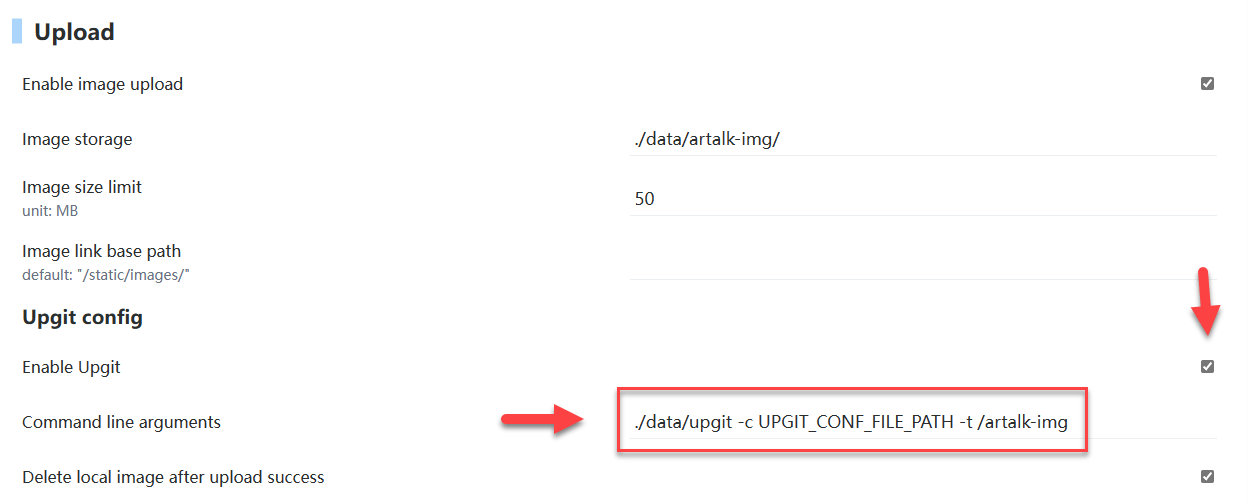
Command line arguments: ./data/upgit -c UPGIT_CONF_FILE_PATH -t /artalk-img
Sau khi cấu hình cơ bản Upgit, khi upload ảnh từ Artalk, link Github sẽ có cấu trúc dạng https://raw.githubusercontent.com/bibicadotnet/img-upgit/main/artalk-img/20231120-103736.080.png
Nếu thích bạn cũng có thể dùng qua các dịch vụ CDN hỗ trợ Github như Staticaly, jsDelivr …
Staticaly: https://cdn.statically.io/gh/bibicadotnet/img-upgit/main/artalk-img/20231120-103736.080.png
jsDelivr: https://cdn.jsdelivr.net/gh/bibicadotnet/img-upgit@main/artalk-img/20231120-103736.080.png
Mình dùng Jetpack thì thêm i0.wp.com vào trước domain
Link sẽ thành https://i0.wp.com/raw.githubusercontent.com/bibicadotnet/img-upgit/main/artalk-img/20231120-103736.080.png
Muốn dùng Cloudflare làm CDN và làm gọn link, có thể dùng các hình thức Reverse Proxy trên Caddy, Nginx đổi lại cho gọn
https://i0.wp.com/raw.githubusercontent.com/bibicadotnet/img-upgit/main/artalk-img/
-> https://api.bibica.net/comment/
Cấu hình Caddy như bên dưới:
api.bibica.net {
    tls /etc/ssl/bibica.net.pem /etc/ssl/bibica.net.key
        handle_path /comment* {
        rewrite * /raw.githubusercontent.com/bibicadotnet/img-upgit/main/artalk-img/{uri}
        reverse_proxy https://i0.wp.com {
        header_up Host {upstream_hostport}
        }
    }
}
Bổ xung đoạn cấu hình replacements bên trong Upgit
[replacements]
"raw.githubusercontent.com/bibicadotnet/img-upgit/main/artalk-img" = "api.bibica.net/comment"
Kết quả
Không chắc lắm lý do, là do Github, Artalk hay Upgit, add 1 tấm ảnh thì mượt, nhưng thử upload nhanh liên tục 2-4 tấm lên thì thấy lỗi, upload từ từ có khi thì cũng upload được nhiều tấm liên tục???

Tạm chưa rõ lý do, mà thường comment mình đa phần upload 1 tấm ảnh để demo cho ý muốn nói là chính, nên cũng lười tìm hiểu thêm sao upload nhiều tấm liên tục lại lỗi 😀
Comment policy: We love comments and appreciate the time that readers spend to share ideas and give feedback.
Notes: However, those deemed to be spam or solely promotional will be deleted.
You can create a Gravatar account, add avatar, then use that email to comment here, your account will have a more beautiful Avatar, easier to recognize with other members.
Please use real emails, you can receive notifications when comments are replied